 Save
Save My kitchen smelled like a pizzeria one random Tuesday morning, which seemed absolutely ridiculous at 6 AM. I'd been staring at leftover pepperoni and a container of Greek yogurt, wondering if breakfast could taste like the pizza I was craving, and that's when these little cups were born. They've become my secret weapon for mornings when I want something that feels indulgent but actually fuels my whole day. Now my family expects them, and honestly, I can't blame them.
I brought these to a weekend potluck thinking they'd be nice but forgettable, and instead people kept circling back asking what they were. One friend actually asked for the recipe right there between bites, which never happens at our gatherings. Watching someone's face light up when they realized it was actually an egg cup with pizza flavors—that moment made me realize these weren't just efficient meal prep, they were genuinely exciting breakfast.
Ingredients
- 8 large eggs: The backbone of these cups, and using fresh eggs makes a noticeable difference in how they set and rise in the oven.
- 1/2 cup Greek yogurt (plain, nonfat or 2%): This is the secret weapon that keeps them creamy and adds protein without needing extra milk, something I discovered by accident when I ran out of heavy cream.
- 1/4 cup whole milk: Just enough to loosen the mixture without making it watery, helping the frittatas bake evenly.
- 1/2 tsp kosher salt and 1/4 tsp freshly ground black pepper: Don't skip the fresh grinding—it tastes noticeably brighter than pre-ground.
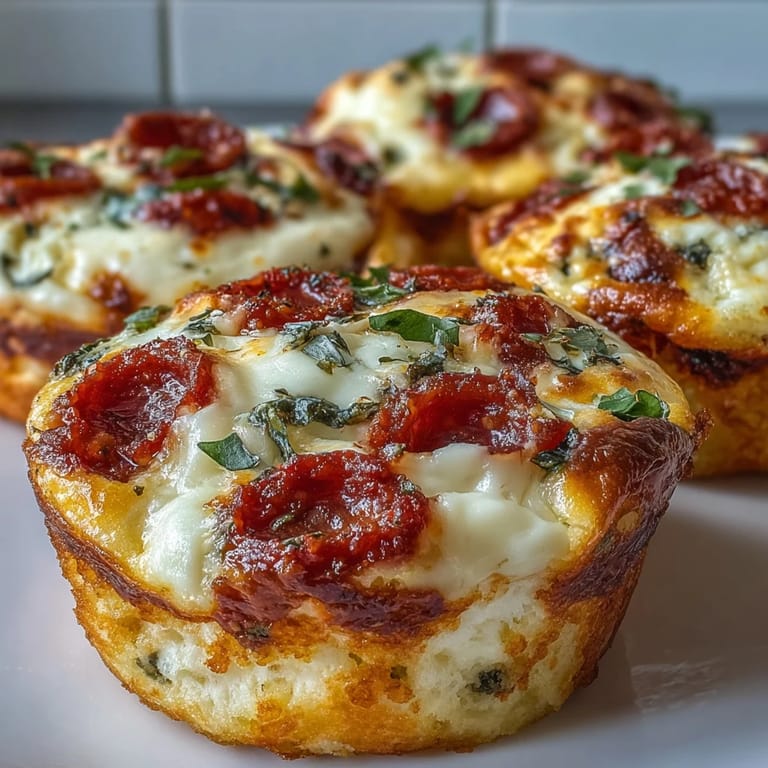
- 3/4 cup mini pepperoni slices: Mini ones distribute better than chopped regular pepperoni, though either works if that's what you have.
- 1 cup shredded mozzarella cheese and 1/4 cup grated Parmesan: The combination gives you stretch and flavor simultaneously, way better than using just one type.
- 1/2 cup pizza sauce: Choose a decent quality one—it's a major flavor player here and makes the difference between tasting good and tasting like actual pizza.
- 1/4 cup diced bell pepper and 1/4 cup finely diced red onion: These add freshness and a slight sweetness that balances the saltiness of the pepperoni.
- 1/2 tsp dried Italian herbs: A simple blend is perfect; I've even used a pinch of garlic powder mixed in when I'm feeling it.
Tired of Takeout? 🥡
Get 10 meals you can make faster than delivery arrives. Seriously.
One email. No spam. Unsubscribe anytime.
Instructions
- Set up and prepare:
- Preheat your oven to 375°F and grease your muffin tin really well—I use a combination of nonstick spray and a paper towel to make sure every corner is covered. This is the moment when the kitchen starts to feel organized, and everything ahead becomes possible.
- Whisk the egg base until silky:
- Combine eggs, Greek yogurt, milk, salt, and pepper in a large bowl and whisk for about a full minute until there are no streaks of yogurt visible and the mixture feels completely smooth. The texture should be uniform and slightly thick, almost like thin pancake batter.
- Mix the filling with intention:
- In a separate bowl, toss together the pepperoni, both cheeses, pizza sauce, bell pepper, red onion, and herbs until everything is well distributed and coated. This is where you get to taste a tiny piece of your end result—I always sneak a piece of pepperoni straight from the bowl.
- Layer strategically:
- Divide the filling mixture evenly among the 12 cups, using about 2 tablespoons per cup and pressing gently so it settles. You want enough to taste the pizza in every bite, but not so much that the egg has nowhere to go.
- Pour and fill to the line:
- Pour the egg mixture over each filled cup until it reaches about three-quarters full, leaving a tiny bit of room for rise. Watch the liquid settle into the spaces around the filling—it's satisfying to watch everything nestle into place.
- Gently distribute one more time:
- Use a fork to stir each cup softly, just enough to make sure the filling and egg are mingled without deflating all your effort. You're not trying to mix it completely, just helping them get acquainted.
- Bake until puffed and set:
- Slide into the oven for 18 to 22 minutes—start checking around 18 if your oven runs hot. They're done when the tops are puffed and lightly golden and the centers barely jiggle when you shake the tin gently.
- Cool and release with care:
- Let them sit in the tin for 5 minutes so the edges firm up, then run a thin knife around each cup and lift out carefully. They'll still be warm and slightly delicate, so patience here prevents crumbling.
 Save
Save My partner came home from work one evening to find me eating three of these cold, straight from the fridge, standing at the counter like they were going out of style. He laughed and asked why I wasn't using a plate, and I realized it's because these stopped feeling like meal prep and started feeling like snacks I genuinely craved. That's when I knew they'd officially become part of our regular rotation.
Storage and Reheating Magic
These cups are genuinely built for the refrigerator—they last up to 4 days without any quality drop, which makes Sunday meal prep feel like you're setting up a whole week of good mornings. I've reheated them in the microwave dozens of times, and the trick is wrapping each one loosely in a damp paper towel and microwaving for just 45 to 60 seconds so they warm through without turning rubbery. They're also surprisingly decent eaten cold if you're in a real hurry, though warm is obviously the move.
Flavor Variations That Work
Once you make these once, your brain starts spinning with possibilities because the egg base is actually a blank canvas. I've done versions with chopped spinach mixed into the filling, crumbled sausage instead of pepperoni, fresh mushrooms sautéed first, and even a Mediterranean version with sun-dried tomatoes and artichokes. The beauty is that the yogurt-egg mixture takes on whatever flavor direction you want to go, so these never have to taste the same twice.
Why This Became a Staple
What started as a curious experiment on a weird Tuesday has become the breakfast I make when I want to feel like I'm winning at meal prep without actually spending much time in the kitchen. These cups prove that eating well doesn't have to mean sad salads or boring egg whites, and that's genuinely revolutionary for breakfast. The combination of high protein, actual flavor, and real-world convenience is hard to beat, and once your family tastes them, they'll understand why you keep making batch after batch.
- Let the cups cool for a full 5 minutes before removing so they hold their shape instead of falling apart in your hands.
- If your oven has hot spots, rotate the muffin tin halfway through baking to ensure they cook evenly.
- Double-check that your muffin tin is actually 12-cup size, because some are 6 or 8 and it changes everything about portions.
 Save
Save These cups have quietly become my answer to the question nobody asks but everyone's thinking: how do I eat something that tastes exciting while actually taking care of myself? They're proof that breakfast can be simple, quick, genuinely delicious, and still do exactly what it's supposed to do.
Recipe FAQs
- → Can I freeze these breakfast cups?
Yes, these freeze exceptionally well. Once completely cooled, place them in an airtight container or freezer bag with parchment paper between layers. They'll keep for up to 3 months. Reheat in the microwave for 1-2 minutes or at 350°F until warmed through.
- → What can I substitute for Greek yogurt?
Sour cream, plain cottage cheese blended smooth, or additional milk all work as substitutes. For dairy-free options, try unsweetened coconut cream or a dairy-free yogurt alternative. The texture will remain similar though the protein content may vary slightly.
- → How do I know when they're fully cooked?
The cups are done when they're puffed and set in the center—no liquid egg should remain visible. A toothpick inserted into the center should come out clean. They'll also develop a light golden color on top. Expect some slight deflation as they cool, which is completely normal.
- → Can I add vegetables to boost nutrition?
Absolutely. Diced spinach, mushrooms, zucchini, or bell peppers work wonderfully. Sauté watery vegetables like spinach or mushrooms beforehand to prevent excess moisture. Add about 1/2 cup total vegetables to the filling mixture before baking.
- → What's the best way to reheat leftovers?
For best texture, reheat in a 350°F oven for 5-7 minutes until warm. The microwave works in 30-60 seconds but may make them slightly rubbery. Letting them come to room temperature before reheating helps maintain their fluffy texture.