 Save
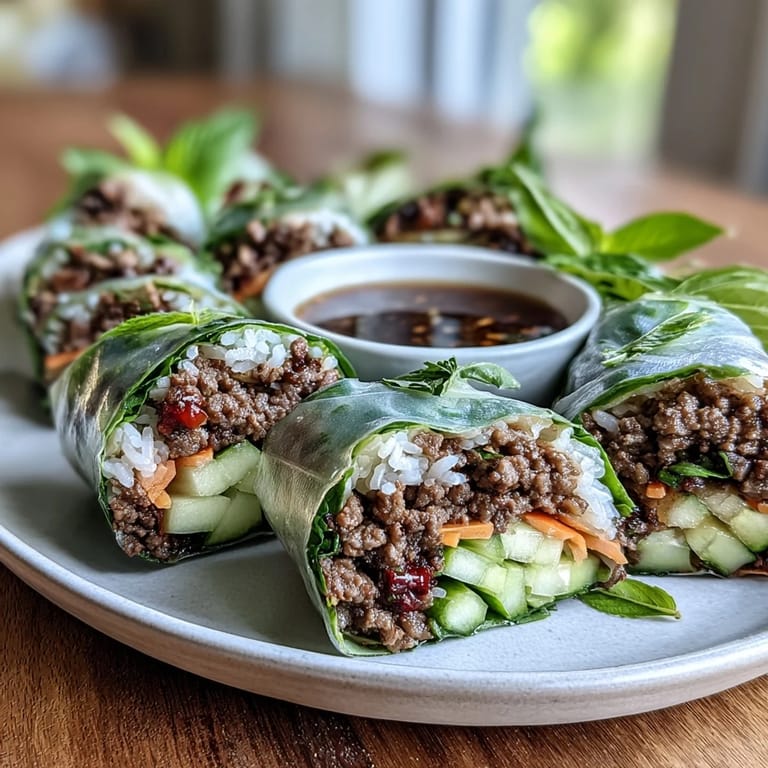
Save The first time I attempted fresh spring rolls, my kitchen looked like a rice paper disaster zone. Sticky wrappers clung to everything except the filling, and my rolls tore apart like wet paper towels. It took me three tries to realize that warm—not hot—water and patience are the real secrets. These Thai Basil Beef Rolls are now my go-to summer dinner, taught to me by a friend who lived in Bangkok. The combination of aromatic basil, crisp vegetables, and that tangy dipping sauce makes all the early failures worth it.
Last summer, I made these rolls for a backyard dinner party. I set out bowls of fillings and let guests roll their own, which turned dinner into a fun hands-on experience. The dipping sauce disappeared so quickly that I had to whisk up a second batch mid-meal. My friend Sarah, who claims to hate cilantro, ended up asking for extra because the fresh herbs and cooling vegetables perfectly complement the rich beef.
Ingredients
- 1 lb ground beef: The 85-90% lean ratio gives you enough fat to keep the beef flavorful and tender without excessive grease
- 3 cloves garlic, minced: Fresh garlic creates the aromatic foundation that Thai cooking relies on
- 1 small shallot, finely minced: Shallots have a milder sweetness than onions that complements the basil beautifully
- 2 Thai birds eye chilies: These bring authentic heat but you can adjust the amount based on your spice tolerance
- 1 small red bell pepper: Adds sweetness and a pop of color while contributing to the fresh crisp texture
- 1 cup fresh Thai basil: This is the star ingredient with its distinctive anise-like aroma that makes this dish uniquely Thai
- Rice paper wrappers: Large 22cm rounds are easier to work with than smaller sizes and hold more filling
- Fresh vegetables and herbs: Lettuce, cucumber, carrots, cilantro, and mint create the refreshing contrast to the savory beef
Tired of Takeout? 🥡
Get 10 meals you can make faster than delivery arrives. Seriously.
One email. No spam. Unsubscribe anytime.
Instructions
- Mix the sauce seasoning:
- Combine soy sauce, fish sauce, oyster sauce, dark soy sauce, and sugar in a small bowl, stirring until the sugar completely dissolves. Add enough water to create a glossy, pourable consistency and set it aside for later.
- Cook the aromatics:
- Heat oil in a large skillet over medium-high heat, then add garlic and shallots, stirring constantly for 30-45 seconds until fragrant and just beginning to turn golden.
- Add the heat:
- Toss in the minced chilies and the white parts of the green onions, stir-frying for 20-30 seconds until their spicy aroma fills your kitchen.
- Brown the beef:
- Add the ground beef, crumbling it with your spatula, and cook for 4-6 minutes, stirring frequently until it is mostly browned and developing crispy edges.
- Soften the peppers:
- Stir in the diced red bell pepper and cook for 2-3 minutes until it begins to soften but still retains some crunch for texture contrast.
- Add the sauce:
- Pour the sauce seasoning over the beef mixture and toss everything together, cooking for 2-3 more minutes until the sauce reduces and clings to the meat.
- Finish with basil:
- Reduce heat to low, add the chopped Thai basil and green parts of the green onions, and toss just until the basil wilts, which takes about 30-45 seconds.
- Add brightness:
- Turn off the heat and stir in the fresh lime juice, then let the beef mixture cool completely to room temperature before rolling.
- Whisk the dipping sauce:
- In a small bowl, combine fish sauce, lime juice, sugar, and warm water, stirring until the sugar dissolves completely, then add garlic, chilies, carrot, and herbs.
- Prepare the rice paper:
- Dip one wrapper in warm water for 3-5 seconds, rotating it to moisten evenly, then place it on your work surface and wait about 20 seconds for it to become pliable.
- Layer the fillings:
- Arrange cooled rice, beef mixture, cucumber, carrots, lettuce, and fresh herbs on the bottom third of the wrapper, being careful not to overfill.
- Roll it up:
- Fold the bottom edge over the filling, fold in the sides, then roll tightly away from you into a neat cylinder and place seam-side down.
 Save
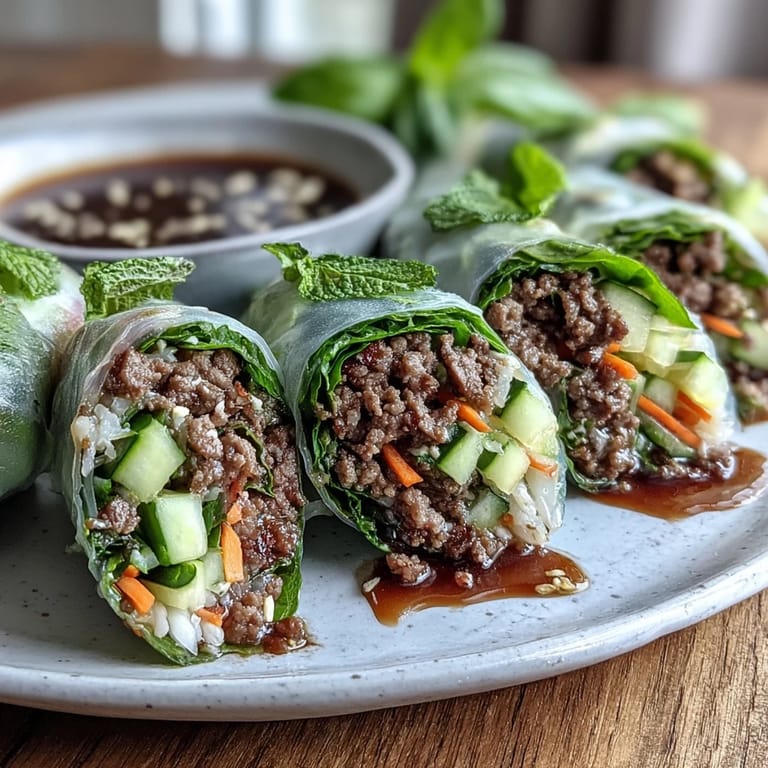
Save These rolls have become my answer to hot summer days when cooking feels like a chore. I love how the fresh herbs and crisp vegetables make each bite feel light and refreshing, while the beef provides enough substance to make a satisfying meal. My kids actually get excited about helping assemble them, which is a rare victory in our house.
Making Ahead
The beef filling keeps beautifully in the refrigerator for up to three days and actually develops deeper flavor as it sits. You can prepare all the vegetables and sauces the night before, storing everything in separate containers. When you are ready to serve, just warm the beef slightly and set up your rolling station for fresh assembly.
Perfecting Your Roll
The tightness of your roll affects both the eating experience and presentation. A loose roll will fall apart when you pick it up, while rolling too tightly can tear the delicate rice paper. The sweet spot is somewhere in the middle, firm enough to hold together but gentle enough to keep the wrapper intact.
Serving Suggestions
These rolls work beautifully as an appetizer, light lunch, or even part of a larger Asian-inspired spread. For a complete meal, serve them alongside a simple soup or steamed dumplings. The dipping sauce is essential, so make sure you have plenty for each roll.
- Slice rolls diagonally with a sharp knife for easier dipping and a more elegant presentation
- Set out extra lime wedges and chili flakes so guests can adjust the flavors to their liking
- Keep assembled rolls covered with a damp paper towel to prevent them from drying out
 Save
Save There is something deeply satisfying about the contrast between the warm, fragrant beef and the cool, crisp vegetables in every bite. These rolls have earned a permanent spot in my regular rotation, and I hope they become a favorite in your kitchen too.
Recipe FAQs
- → Can I make these beef rolls ahead of time?
The beef filling can be prepared up to 2 days in advance and stored refrigerated. Assemble rolls within 2-3 hours of serving for best texture. Cover assembled rolls with a damp towel and plastic wrap to prevent drying. Let chilled rolls sit at room temperature for 10-15 minutes before serving.
- → What can I substitute for Thai basil?
Italian basil combined with fresh mint makes a good substitute for Thai basil. Use about three-quarters Italian basil and one-quarter mint to approximate the anise-like notes. Regular sweet basil works too, though the flavor profile will be slightly different.
- → How do I prevent rice paper from tearing?
Use warm—not hot—water and dip wrappers for just 3-5 seconds. The paper continues softening as you work. Handle gently once softened, and roll immediately after adding filling. A lightly oiled board or plate helps prevent sticking.
- → Can I use ground turkey or chicken instead?
Ground turkey or chicken work well as lighter alternatives. Both leaner meats absorb flavors beautifully, though you may want to add a small amount of oil to prevent the filling from drying out. Seasoning adjustments are typically unnecessary.
- → Are these rolls gluten-free?
The rolls can be made gluten-free by using tamari instead of soy sauce, choosing gluten-free oyster sauce, and omitting dark soy sauce. Rice paper wrappers are naturally gluten-free. Always check ingredient labels to ensure your sauces meet your dietary needs.
- → How should I store leftovers?
Fresh rolls are best enjoyed immediately but can be refrigerated for up to 2-3 hours when covered properly. The rice paper becomes tough when stored longer. Alternatively, store components separately and assemble just before serving for optimal texture.